GitLab Managed Apps (DEPRECATED) (FREE)
GitLab Managed Apps was created to help you configure applications in your cluster directly from GitLab. You could use this feature through two different methods: "one-click install" and "CI/CD template". Both methods are deprecated:
- The one-click install method was deprecated in GitLab 13.9 and will be removed in GitLab 14.0.
- The CI/CD template method was deprecated in GitLab 13.12 and is scheduled to be removed in GitLab 15.0.
Both methods were limiting as you couldn't fully customize your third-party apps installed through GitLab Managed Apps. Therefore, we decided to deprecate this feature and provide better GitOps-driven alternatives to our users, such as cluster integrations and cluster management project.
Read the sections below according to the installation method you chose to learn how to proceed to keep your apps up and running:
Install using GitLab CI/CD (DEPRECATED)
- Introduced in GitLab 12.6.
- Deprecated in GitLab 13.12.
WARNING:
The GitLab Managed Apps CI/CD installation method was deprecated in 13.12.
Your applications continue to work. However, we no longer support and maintain the GitLab CI/CD template for
Managed Apps (Managed-Cluster-Applications.gitlab-ci.yml).
As a replacement, we are working on a cluster management project template,
still to be released.
The CI/CD template was the primary method for installing applications to clusters via GitLab Managed Apps and customize them through Helm.
Supported applications:
- Ingress
- cert-manager
- Sentry
- GitLab Runner
- Cilium
- Falco
- Vault
- JupyterHub
- Elastic Stack
- Crossplane
- Fluentd
- Knative
- PostHog
- Prometheus
Usage
You can find and import all the files referenced below in the example cluster applications project.
To install applications using GitLab CI/CD:
-
Connect the cluster to a cluster management project.
-
In that project, add a
.gitlab-ci.ymlfile with the following content:include: - template: Managed-Cluster-Applications.gitlab-ci.ymlThe job provided by this template connects to the
*(default) cluster using tools provided in a custom Docker image. It requires that you have a runner registered with the Docker, Kubernetes, or Docker Machine executor.To install to a specific cluster, read Use the template with a custom environment.
-
Add a
.gitlab/managed-apps/config.yamlfile to define which applications you would like to install. Define theinstalledkey astrueto install the application andfalseto uninstall the application. For example, to install Ingress:ingress: installed: true -
Optionally, define
.gitlab/managed-apps/<application>/values.yamlfile to customize values for the installed application.
A GitLab CI/CD pipeline runs on the master branch to install the
applications you have configured. In case of pipeline failure, the
output of the Helm Tiller binary
is saved as a CI job artifact.
Usage in GitLab versions earlier than 13.5
For GitLab versions 13.5 and earlier, the Ingress, Fluentd, Prometheus, and Sentry
apps were fetched from the central Helm stable repository (https://kubernetes-charts.storage.googleapis.com/).
This repository was deleted
on November 13, 2020. This causes the installation CI/CD pipeline to
fail. Upgrade to GitLab 13.6, or alternatively, you can
use the following .gitlab-ci.yml, which has been tested in GitLab 13.5:
include:
  - template: Managed-Cluster-Applications.gitlab-ci.yml
apply:
image: "registry.gitlab.com/gitlab-org/cluster-integration/cluster-applications:v0.37.0"Use the template with a custom environment
If you only want apps to be installed on a specific cluster, or if your cluster's
scope does not match production, you can override the environment name in your .gitlab-ci.yml
file:
include:
- template: Managed-Cluster-Applications.gitlab-ci.yml
apply:
except:
variables:
- '$CI_JOB_NAME == "apply"'
.managed-apps:
extends: apply
example-install:
extends: .managed-apps
environment:
name: example/productionImportant notes
Note the following:
- We recommend using the cluster management project exclusively for managing deployments to a cluster. Do not add your application's source code to such projects.
- When you set the value for
installedkey back tofalse, the application is unprovisioned from the cluster. - If you update
.gitlab/managed-apps/<application>/values.yamlwith new values, the application is redeployed.
Install Ingress using GitLab CI/CD
Deprecated in GitLab 13.12.
To install Ingress, define the .gitlab/managed-apps/config.yaml file
with:
ingress:
installed: trueIngress is installed into the gitlab-managed-apps namespace
of your cluster.
You can customize the installation of Ingress by defining a
.gitlab/managed-apps/ingress/values.yaml file in your cluster
management project. Refer to the
chart
for the available configuration options.
Support for installing the Ingress managed application is provided by the GitLab Configure group. If you run into unknown issues, open a new issue, and ping at least 2 people from the Configure group.
Install cert-manager using GitLab CI/CD
Deprecated in GitLab 13.12.
cert-manager is installed using GitLab CI/CD by defining configuration in
.gitlab/managed-apps/config.yaml.
cert-manager:
- Is installed into the
gitlab-managed-appsnamespace of your cluster. - Can be installed with or without a default
Let's Encrypt
ClusterIssuer, which requires an email address to be specified. The email address is used by Let's Encrypt to contact you about expiring certificates and issues related to your account.
The following configuration is required to install cert-manager using GitLab CI/CD:
certManager:
  installed: true
  letsEncryptClusterIssuer:
    installed: true
    email: "user@example.com"
The following installs cert-manager using GitLab CI/CD without the default ClusterIssuer:
certManager:
  installed: true
  letsEncryptClusterIssuer:
    installed: false
You can customize the installation of cert-manager by defining a
.gitlab/managed-apps/cert-manager/values.yaml file in your cluster
management project. Refer to the
chart for the
available configuration options.
Support for installing the Cert Manager managed application is provided by the GitLab Configure group. If you run into unknown issues, open a new issue, and ping at least 2 people from the Configure group.
Install Sentry using GitLab CI/CD
Deprecated in GitLab 13.12.
The Sentry Helm chart recommends at least 3 GB of available RAM for database migrations.
To install Sentry, define the .gitlab/managed-apps/config.yaml file
with:
sentry:
  installed: true
Sentry is installed into the gitlab-managed-apps namespace
of your cluster.
You can customize the installation of Sentry by defining
.gitlab/managed-apps/sentry/values.yaml file in your cluster
management project. Refer to the
chart
for the available configuration options.
We recommend you pay close attention to the following configuration options:
-
email. Needed to invite users to your Sentry instance and to send error emails. -
user. Where you can set the login credentials for the default administrator user. -
postgresql. For a PostgreSQL password that can be used when running future updates.
When upgrading, it's important to provide the existing PostgreSQL password (given
using the postgresql.postgresqlPassword key) to avoid authentication errors.
Read the PostgreSQL chart documentation
for more information.
Here is an example configuration for Sentry:
# Admin user to create
user:
  # Indicated to create the admin user or not,
  # Default is true as the initial installation.
  create: true
  email: "<your email>"
  password: "<your password>"

email:
  from_address: "<your from email>"
  host: smtp
  port: 25
  use_tls: false
  user: "<your email username>"
  password: "<your email password>"
  enable_replies: false

ingress:
  enabled: true
  hostname: "<sentry.example.com>"

# Needs to be here between runs.
# See https://github.com/helm/charts/tree/master/stable/postgresql#upgrade for more info
postgresql:
  postgresqlPassword: example-postgresql-password
Support for installing the Sentry managed application is provided by the GitLab Health group. If you run into unknown issues, open a new issue, and ping at least 2 people from the Health group.
Install PostHog using GitLab CI/CD
Deprecated in GitLab 13.12.
PostHog 🦔 is a developer-friendly, open-source product analytics platform.
To install PostHog into the gitlab-managed-apps namespace of your cluster,
define the .gitlab/managed-apps/config.yaml file with:
posthog:
  installed: true
You can customize the installation of PostHog by defining .gitlab/managed-apps/posthog/values.yaml
in your cluster management project. Refer to the
Configuration section
of the PostHog chart's README for the available configuration options.
You must provide a PostgreSQL password in postgresql.postgresqlPassword
to avoid authentication errors. Read the
PostgreSQL chart documentation
for more information.
Redis pods are restarted between upgrades. To prevent downtime, provide a Redis
password using the redis.password key. This prevents a new password from
being generated on each restart.
Here is an example configuration for PostHog:
ingress:
  enabled: true
  hostname: "<posthog.example.com>"

# This will be autogenerated if you skip it. Include if you have 2 or more web replicas
posthogSecret: 'long-secret-key-used-to-sign-cookies'

# Needs to be here between runs.
# See https://github.com/helm/charts/tree/master/stable/postgresql#upgrade for more info
postgresql:
  postgresqlPassword: example-postgresql-password

# Recommended to set this to a value to redis prevent downtime between upgrades
redis:
  password: example-redis-password
Support for the PostHog managed application is provided by the PostHog team. If you run into issues, open a support ticket directly.
Install Prometheus using GitLab CI/CD
- Introduced in GitLab 12.8.
- Deprecated in GitLab 13.12.
Prometheus is an open-source monitoring and alerting system for supervising your deployed applications.
To install Prometheus into the gitlab-managed-apps namespace of your cluster,
define the .gitlab/managed-apps/config.yaml file with:
prometheus:
  installed: true
You can customize the installation of Prometheus by defining
.gitlab/managed-apps/prometheus/values.yaml in your cluster management
project. Refer to the
Configuration section
of the Prometheus chart's README for the available configuration options.
Support for installing the Prometheus managed application is provided by the GitLab APM group. If you run into unknown issues, open a new issue, and ping at least 2 people from the APM group.
Install GitLab Runner using GitLab CI/CD
Deprecated in GitLab 13.12.
GitLab Runner is installed using GitLab CI/CD by defining configuration in
.gitlab/managed-apps/config.yaml.
The following configuration is required to install GitLab Runner using GitLab CI/CD:
gitlabRunner:
  installed: true
GitLab Runner is installed into the gitlab-managed-apps namespace of your cluster.
For GitLab Runner to function, you must specify the following:
-
gitlabUrl: The GitLab server full URL (for example,https://gitlab.example.com) to register the Runner against. -
runnerRegistrationToken: The registration token for adding new runners to GitLab. This must be retrieved from your GitLab instance.
These values can be specified using CI/CD variables:
-
GITLAB_RUNNER_GITLAB_URLis used forgitlabUrl. -
GITLAB_RUNNER_REGISTRATION_TOKENis used forrunnerRegistrationToken
You can customize the installation of GitLab Runner by defining
.gitlab/managed-apps/gitlab-runner/values.yaml file in your cluster
management project. Refer to the
chart for the
available configuration options.
Support for installing the GitLab Runner managed application is provided by the GitLab Runner group. If you run into unknown issues, open a new issue, and ping at least 2 people from the Runner group.
Install Cilium using GitLab CI/CD
- Introduced in GitLab 12.8.
- Deprecated in GitLab 13.12.
Cilium is a networking plugin for Kubernetes that you can use to implement support for NetworkPolicy resources. For more information, see Network Policies.
For an overview, see the Container Network Security Demo for GitLab 12.8.
Enable Cilium in the .gitlab/managed-apps/config.yaml file to install it:
# possible values are gke or eks
clusterType: gke

cilium:
  installed: true
The clusterType variable enables the recommended Helm variables for a corresponding cluster type.
You can check the recommended variables for each cluster type in the official documentation:
Do not use clusterType for sandbox environments like Minikube.
You can customize Cilium's Helm variables by defining the
.gitlab/managed-apps/cilium/values.yaml file in your cluster
management project. Refer to the
Cilium chart
for the available configuration options.
You can check Cilium's installation status on the cluster management page:
- Project-level cluster: Navigate to your project's Operations > Kubernetes page.
- Group-level cluster: Navigate to your group's Kubernetes page.
WARNING: Installation and removal of the Cilium requires a manual restart of all affected pods in all namespaces to ensure that they are managed by the correct networking plugin.
NOTE: Major upgrades might require additional setup steps. For more information, see the official upgrade guide.
By default, Cilium's
audit mode
is enabled. In audit mode, Cilium doesn't drop disallowed packets. You
can use policy-verdict log to observe policy-related decisions. You
can disable audit mode by adding the following to
.gitlab/managed-apps/cilium/values.yaml:
config:
  policyAuditMode: false

agent:
  monitor:
    eventTypes: ["drop"]
The Cilium monitor log for traffic is logged out by the
cilium-monitor sidecar container. You can check these logs with the following command:
kubectl -n gitlab-managed-apps logs -l k8s-app=cilium -c cilium-monitorYou can disable the monitor log in .gitlab/managed-apps/cilium/values.yaml:
agent:
  monitor:
    enabled: false
The Hubble monitoring daemon is enabled by default
and it's set to collect per namespace flow metrics. This metrics are accessible on the
Threat Monitoring
dashboard. You can disable Hubble by adding the following to
.gitlab/managed-apps/cilium/values.yaml:
global:
  hubble:
    enabled: false
You can also adjust Helm values for Hubble by using
.gitlab/managed-apps/cilium/values.yaml:
global:
  hubble:
    enabled: true
    metrics:
      enabled:
      - 'flow:sourceContext=namespace;destinationContext=namespace'
Support for installing the Cilium managed application is provided by the GitLab Container Security group. If you run into unknown issues, open a new issue, and ping at least 2 people from the Container Security group.
Install Falco using GitLab CI/CD
- Introduced in GitLab 13.1.
- Deprecated in GitLab 13.12.
GitLab Container Host Security Monitoring uses Falco as a runtime security tool that listens to the Linux kernel using eBPF. Falco parses system calls and asserts the stream against a configurable rules engine in real-time. For more information, see Falco's Documentation.
You can enable Falco in the
.gitlab/managed-apps/config.yaml file:
falco:
  installed: true
You can customize Falco's Helm variables by defining the
.gitlab/managed-apps/falco/values.yaml file in your cluster
management project. Refer to the
Falco chart
for the available configuration options.
WARNING:
By default eBPF support is enabled and Falco uses an
eBPF probe
to pass system calls to user space. If your cluster doesn't support this, you can
configure it to use Falco kernel module instead by adding the following to
.gitlab/managed-apps/falco/values.yaml:
ebpf:
  enabled: false
In rare cases where probe installation on your cluster isn't possible and the kernel/probe
isn't pre-compiled, you may need to manually prepare the kernel module or eBPF probe with
driverkit
and install it on each cluster node.
By default, Falco is deployed with a limited set of rules. To add more rules, add
the following to .gitlab/managed-apps/falco/values.yaml (you can get examples from
Cloud Native Security Hub):
customRules:
  file-integrity.yaml: |-
    - rule: Detect New File
      desc: detect new file created
      condition: >
        evt.type = chmod or evt.type = fchmod
      output: >
        File below a known directory opened for writing (user=%user.name
        command=%proc.cmdline file=%fd.name parent=%proc.pname pcmdline=%proc.pcmdline gparent=%proc.aname[2])
      priority: ERROR
      tags: [filesystem]
    - rule: Detect New Directory
      desc: detect new directory created
      condition: >
        mkdir
      output: >
        File below a known directory opened for writing (user=%user.name
        command=%proc.cmdline file=%fd.name parent=%proc.pname pcmdline=%proc.pcmdline gparent=%proc.aname[2])
      priority: ERROR
      tags: [filesystem]
By default, Falco only outputs security events to logs as JSON objects. To set it to output to an
external API
or application,
add the following to .gitlab/managed-apps/falco/values.yaml:
falco:
  programOutput:
    enabled: true
    keepAlive: false
    program: mail -s "Falco Notification" someone@example.com

  httpOutput:
    enabled: true
    url: http://some.url
You can check these logs with the following command:
kubectl -n gitlab-managed-apps logs -l app=falcoSupport for installing the Falco managed application is provided by the GitLab Container Security group. If you run into unknown issues, open a new issue, and ping at least 2 people from the Container Security group.
Install Vault using GitLab CI/CD
- Introduced in GitLab 12.9.
- Deprecated in GitLab 13.12.
HashiCorp Vault is a secrets management solution which can be used to safely manage and store passwords, credentials, certificates, and more. A Vault installation could be leveraged to provide a single secure data store for credentials used in your applications, GitLab CI/CD jobs, and more. It could also serve as a way of providing SSL/TLS certificates to systems and deployments in your infrastructure. Leveraging Vault as a single source for all these credentials allows greater security by having a single source of access, control, and auditability around all your sensitive credentials and certificates. This feature requires giving GitLab the highest level of access and control. Therefore, if GitLab is compromised, the security of this Vault instance is as well. To avoid this security risk, GitLab recommends using your own HashiCorp Vault to leverage external secrets with CI.
To install Vault, enable it in the .gitlab/managed-apps/config.yaml file:
vault:
  installed: true
By default you receive a basic Vault setup with no scalable storage backend. This is enough for simple testing and small-scale deployments, though has limits to how much it can scale, and as it's a single instance deployment, upgrading the Vault application causes downtime.
To optimally use Vault in a production environment, it's ideal to have a good understanding
of the internals of Vault and how to configure it. This can be done by reading
the Vault Configuration guide,
the Vault documentation and
the Vault Helm chart values.yaml file.
At a minimum, most users set up:
- A seal for extra encryption of the main key.
- A storage backend that's suitable for environment and storage security requirements.
- HA Mode.
- The Vault UI.
The following is an example values file (.gitlab/managed-apps/vault/values.yaml)
that configures Google Key Management Service for auto-unseal, using a Google Cloud Storage backend, enabling
the Vault UI, and enabling HA with 3 pod replicas. The storage and seal stanzas
below are examples and should be replaced with settings specific to your environment.
# Enable the Vault WebUI
ui:
  enabled: true
server:
  # Disable the built in data storage volume as it's not safe for High Availability mode
  dataStorage:
    enabled: false
  # Enable High Availability Mode
  ha:
    enabled: true
    # Configure Vault to listen on port 8200 for normal traffic and port 8201 for inter-cluster traffic
    config: |
      listener "tcp" {
        tls_disable = 1
        address = "[::]:8200"
        cluster_address = "[::]:8201"
      }
      # Configure Vault to store its data in a GCS Bucket backend
      storage "gcs" {
        path = "gcs://my-vault-storage/vault-bucket"
        ha_enabled = "true"
      }
      # Configure Vault to unseal storage using a GKMS key
      seal "gcpckms" {
         project     = "vault-helm-dev-246514"
         region      = "global"
         key_ring    = "vault-helm-unseal-kr"
         crypto_key  = "vault-helm-unseal-key"
      }
After you have successfully installed Vault, you must
initialize the Vault
and obtain the initial root token. You need access to your Kubernetes cluster that
Vault has been deployed into in order to do this. To initialize the Vault, get a
shell to one of the Vault pods running inside Kubernetes (typically this is done
by using the kubectl command line tool). After you have a shell into the pod,
run the vault operator init command:
kubectl -n gitlab-managed-apps exec -it vault-0 sh
/ $ vault operator init
This should give you your unseal keys and initial root token. Make sure to note these down and keep these safe, as they're required to unseal the Vault throughout its lifecycle.
Support for installing the Vault managed application is provided by the GitLab Release Management group. If you run into unknown issues, open a new issue, and ping at least 2 people from the Release Management group.
Install JupyterHub using GitLab CI/CD
- Introduced in GitLab 12.8.
- Deprecated in GitLab 13.12.
JupyterHub is installed using GitLab CI/CD by defining configuration in
.gitlab/managed-apps/config.yaml as follows:
jupyterhub:
  installed: true
  gitlabProjectIdWhitelist: []
  gitlabGroupWhitelist: []
In the configuration:
-
gitlabProjectIdWhitelistrestricts GitLab authentication to only members of the specified projects. -
gitlabGroupWhitelistrestricts GitLab authentication to only members of the specified groups. - Specifying an empty array for both allows any user on the GitLab instance to sign in.
JupyterHub is installed into the gitlab-managed-apps namespace of your cluster.
For JupyterHub to function, you must set up an OAuth Application. Set:
- "Redirect URI" to
http://<JupyterHub Host>/hub/oauth_callback. - "Scope" to
api read_repository write_repository.
In addition, the following variables must be specified using CI/CD variables:
-
JUPYTERHUB_PROXY_SECRET_TOKEN- Secure string used for signing communications from the hub. Readproxy.secretToken. -
JUPYTERHUB_COOKIE_SECRET- Secure string used for signing secure cookies. Readhub.cookieSecret. -
JUPYTERHUB_HOST- Hostname used for the installation. For example,jupyter.gitlab.example.com. -
JUPYTERHUB_GITLAB_HOST- Hostname of the GitLab instance used for authentication. For example,gitlab.example.com. -
JUPYTERHUB_AUTH_CRYPTO_KEY- A 32-byte encryption key used to setauth.state.cryptoKey. -
JUPYTERHUB_AUTH_GITLAB_CLIENT_ID- "Application ID" for the OAuth Application. -
JUPYTERHUB_AUTH_GITLAB_CLIENT_SECRET- "Secret" for the OAuth Application.
By default, JupyterHub is installed using a
default values file.
You can customize the installation of JupyterHub by defining a
.gitlab/managed-apps/jupyterhub/values.yaml file in your cluster management project.
Refer to the chart reference for the available configuration options.
Support for installing the JupyterHub managed application is provided by the GitLab Configure group. If you run into unknown issues, open a new issue, and ping at least 2 people from the Configure group.
Install Elastic Stack using GitLab CI/CD
- Introduced in GitLab 12.8.
- Deprecated in GitLab 13.12.
Elastic Stack is installed using GitLab CI/CD by defining configuration in
.gitlab/managed-apps/config.yaml.
The following configuration is required to install Elastic Stack using GitLab CI/CD:
elasticStack:
  installed: true
Elastic Stack is installed into the gitlab-managed-apps namespace of your cluster.
You can check the default
values.yaml
we set for this chart.
You can customize the installation of Elastic Stack by defining
.gitlab/managed-apps/elastic-stack/values.yaml file in your cluster
management project. Refer to the
chart for all
available configuration options.
NOTE: In this alpha implementation of installing Elastic Stack through CI, reading the environment logs through Elasticsearch is unsupported. This is supported if installed with the UI.
Support for installing the Elastic Stack managed application is provided by the GitLab APM group. If you run into unknown issues, open a new issue, and ping at least 2 people from the APM group.
Install Crossplane using GitLab CI/CD
- Introduced in GitLab 12.9.
- Deprecated in GitLab 13.12.
Crossplane is installed using GitLab CI/CD by defining configuration in
.gitlab/managed-apps/config.yaml.
The following configuration is required to install Crossplane using GitLab CI/CD:
Crossplane:
  installed: true
Crossplane is installed into the gitlab-managed-apps namespace of your cluster.
You can check the default
values.yaml
we set for this chart.
You can customize the installation of Crossplane by defining
.gitlab/managed-apps/crossplane/values.yaml file in your cluster
management project. Refer to the
chart
for the available configuration options. Note that this link points to the documentation
for the current development release, which may differ from the version you have installed.
Support for the Crossplane managed application is provided by the Crossplane team. If you run into issues, open a support ticket directly.
Install Fluentd using GitLab CI/CD
- Introduced in GitLab 12.10.
- Deprecated in GitLab 13.12.
To install Fluentd into the gitlab-managed-apps namespace of your cluster using
GitLab CI/CD, define the following configuration in .gitlab/managed-apps/config.yaml:
Fluentd:
  installed: true
You can also review the default values set for this chart in the
values.yaml file.
You can customize the installation of Fluentd by defining
.gitlab/managed-apps/fluentd/values.yaml file in your cluster management
project. Refer to the
configuration chart
for the current development release of Fluentd for all available configuration options.
The configuration chart link points to the current development release, which may differ from the version you have installed. To ensure compatibility, switch to the specific branch or tag you are using.
Support for installing the Fluentd managed application is provided by the GitLab Container Security group. If you run into unknown issues, open a new issue, and ping at least 2 people from the Container Security group.
Install Knative using GitLab CI/CD
Deprecated in GitLab 13.12.
To install Knative, define the .gitlab/managed-apps/config.yaml file
with:
knative:
  installed: true
You can customize the installation of Knative by defining .gitlab/managed-apps/knative/values.yaml
file in your cluster management project. Refer to the chart
for all available configuration options.
Here is an example configuration for Knative:
domain: 'my.wildcard.A.record.dns'If you plan to use GitLab Serverless capabilities, be sure to set an A record
wildcard domain on your custom configuration.
Support for installing the Knative managed application is provided by the GitLab Configure group. If you run into unknown issues, open a new issue, and ping at least 2 people from the Configure group.
Knative Metrics
GitLab provides Invocation Metrics for your functions. To collect these metrics, you must have:
-
Knative and Prometheus managed applications installed on your cluster.
-
Manually applied the custom metrics on your cluster by running the following command:
kubectl apply -f https://gitlab.com/gitlab-org/cluster-integration/cluster-applications/-/raw/02c8231e30ef5b6725e6ba368bc63863ceb3c07d/src/default-data/knative/istio-metrics.yaml
Uninstall Knative
To uninstall Knative, you must first manually remove any custom metrics you have added by running the following command:
kubectl delete -f https://gitlab.com/gitlab-org/cluster-integration/cluster-applications/-/raw/02c8231e30ef5b6725e6ba368bc63863ceb3c07d/src/default-data/knative/istio-metrics.yamlInstall AppArmor using GitLab CI/CD
- Introduced in GitLab 13.1.
- Deprecated in GitLab 13.12.
To install AppArmor into the gitlab-managed-apps namespace of your cluster using
GitLab CI/CD, define the following configuration in .gitlab/managed-apps/config.yaml:
apparmor:
  installed: true
You can define one or more AppArmor profiles by adding them into
.gitlab/managed-apps/apparmor/values.yaml as the following:
profiles:
  profile-one: |-
    profile profile-one {
      file,
    }
Refer to the AppArmor chart for more information on this chart.
Using AppArmor profiles in your deployments
After installing AppAmor, you can use profiles by adding Pod Annotations. If you're using
Auto DevOps, you can customize auto-deploy-values.yaml
to annotate your pods. Although it's helpful to be aware of the
list of custom attributes,
you're only required to set podAnnotations as follows:
podAnnotations:
  container.apparmor.security.beta.kubernetes.io/auto-deploy-app: localhost/profile-one
The only information to be changed here is the profile name which is profile-one
in this example. Refer to the
AppArmor tutorial
for more information on how AppArmor is integrated in Kubernetes.
Using PodSecurityPolicy in your deployments
To enable AppArmor annotations on a Pod Security Policy you must first load the corresponding AppArmor profile.
Pod Security Policies are
resources at the cluster level that control security-related
properties of deployed pods. You can use such a policy to enable
loaded AppArmor profiles and apply necessary pod restrictions across a
cluster. You can deploy a new policy by adding the following
to.gitlab/managed-apps/apparmor/values.yaml:
securityPolicies:
  example:
    defaultProfile: profile-one
    allowedProfiles:
    - profile-one
    - profile-two
    spec:
      privileged: false
      seLinux:
        rule: RunAsAny
      supplementalGroups:
        rule: RunAsAny
      runAsUser:
        rule: RunAsAny
      fsGroup:
        rule: RunAsAny
      volumes:
        - '*'
This example creates a single policy named example with the provided specification,
and enables AppArmor annotations on it.
Support for installing the AppArmor managed application is provided by the GitLab Container Security group. If you run into unknown issues, open a new issue, and ping at least 2 people from the Container Security group.
Browse applications logs
Introduced in GitLab 13.2.
Logs produced by pods running GitLab Managed Apps can be browsed using Log Explorer.
Install with one click (DEPRECATED)
WARNING: The one-click installation method was deprecated in GitLab 13.9 and will be removed in GitLab 14.0. The removal does not break nor uninstall any apps you have installed but removes the GitLab UI page for installing and updating your GitLab Managed Apps. Follow the process to take ownership of your GitLab Managed Apps.
Applications managed by GitLab are installed onto the gitlab-managed-apps
namespace. This namespace:
- Is different from the namespace used for project deployments.
- Is created once.
- Has a non-configurable name.
To view a list of available applications to install for a:
- Project-level cluster, navigate to your project's Operations > Kubernetes.
- Group-level cluster, navigate to your group's Kubernetes page.
You can install the following applications with one click:
- Helm
- Ingress
- cert-manager
- Prometheus
- GitLab Runner
- JupyterHub
- Knative
- Crossplane
- Elastic Stack
- Fluentd
With the exception of Knative, the applications are installed in a dedicated
namespace called gitlab-managed-apps.
Some applications are installable only for a project-level cluster. Support for installing these applications in a group-level cluster is planned for future releases. For updates, see the issue tracking progress.
WARNING: If you have an existing Kubernetes cluster with Helm already installed, you should be careful as GitLab cannot detect it. In this case, installing Helm with the applications results in the cluster having it twice, which can lead to confusion during deployments.
In GitLab versions 11.6 and greater, Helm is upgraded to the latest version supported by GitLab before installing any of the applications.
Helm
- Introduced in GitLab 10.2 for project-level clusters.
- Introduced in GitLab 11.6 for group-level clusters.
- Uses a local Tiller in GitLab 13.2 and later.
- Uses Helm 3 for clusters created with GitLab 13.6 and later.
- Offers legacy Tiller removal in GitLab 13.7 and later.
Helm is a package manager for Kubernetes and is
used to install the GitLab-managed apps. GitLab runs each helm command
in a pod in the gitlab-managed-apps namespace inside the cluster.
- For clusters created in GitLab 13.6 and newer, GitLab uses Helm 3 to manage applications.
- For clusters created on versions of GitLab prior to 13.6, GitLab uses Helm 2
with a local Tiller server. Prior
to GitLab 13.2, GitLab
used an in-cluster Tiller server in the
gitlab-managed-appsnamespace. You can safely uninstall the server from the GitLab application page if you have previously installed it. This doesn't affect your other applications.
The GitLab Helm integration does not support installing applications behind a proxy, but a workaround is available.
Upgrade a cluster to Helm 3
GitLab does not offer a way to migrate existing application management on existing clusters from Helm 2 to Helm 3. To migrate a cluster to Helm 3:
- Uninstall all applications on your cluster.
- Remove the cluster integration.
- Re-add the cluster as an existing cluster.
cert-manager
Introduced in GitLab 11.6 for project- and group-level clusters.
cert-manager is a native Kubernetes certificate management controller that helps with issuing certificates. Installing cert-manager on your cluster issues a certificate by Let's Encrypt and ensures that certificates are valid and up-to-date.
The chart used to install this application depends on the version of GitLab used. In:
- GitLab 12.3 and newer, the
jetstack/cert-managerchart is used with avalues.yamlfile. - GitLab 12.2 and older, the
stable/cert-managerchart was used.
If you installed cert-manager prior to GitLab 12.3, Let's Encrypt
blocks requests
from older versions of cert-manager. To resolve this:
- Back up any additional configuration.
- Uninstall cert-manager.
- Install cert-manager again.
GitLab Runner
- Introduced in GitLab 10.6 for project-level clusters.
- Introduced in GitLab 11.10 for group-level clusters.
GitLab Runner is the open source project that is used to run your jobs and send the results back to GitLab. It's used in conjunction with GitLab CI/CD, the open-source continuous integration service included with GitLab that coordinates the jobs.
If the project is on GitLab.com, shared runners are available. You don't have to deploy one if they are enough for your needs. If a project-specific runner is desired, or there are no shared runners, you can deploy one.
The deployed runner is set as privileged. Root access to the underlying server is required to build Docker images, so it's the default. Be sure to read the security implications before deploying one.
The runner/gitlab-runner
chart is used to install this application, using
a preconfigured values.yaml
file. Customizing the installation by modifying this file is not supported. This
also means you cannot modify config.toml file for this Runner. If you want to
have that possibility and still deploy Runner in Kubernetes, consider using the
Cluster management project or installing Runner manually
via GitLab Runner Helm Chart.
Ingress
- Introduced in GitLab 10.2 for project-level clusters.
- Introduced in GitLab 11.6 for group-level clusters.
Ingress provides load balancing, SSL termination, and name-based virtual hosting out of the box. It acts as a web proxy for your applications and is useful if you want to use Auto DevOps or deploy your own web apps.
The Ingress Controller installed is Ingress-NGINX, which is supported by the Kubernetes community.
With the following procedure, a load balancer must be installed in your cluster to obtain the endpoint. You can use either Ingress, or Knative's own load balancer (Istio) if using Knative.
To publish your web application, you first need to find the endpoint, which is either an IP address or a hostname associated with your load balancer.
To install it, click on the Install button for Ingress. GitLab attempts to determine the external endpoint and it should be available in a few minutes.
Determining the external endpoint automatically
Introduced in GitLab 10.6.
After you install Ingress, the external endpoint should be available in a few minutes.
NOTE:
This endpoint can be used for the
Auto DevOps base domain
using the KUBE_INGRESS_BASE_DOMAIN environment variable.
If the endpoint doesn't appear and your cluster runs on Google Kubernetes Engine:
- Examine your Kubernetes cluster on Google Kubernetes Engine to ensure there are no errors on its nodes.
- Ensure you have enough Quotas on Google Kubernetes Engine. For more information, see Resource Quotas.
- Review Google Cloud's Status for service disruptions.
The stable/nginx-ingress
chart is used to install this application with a
values.yaml
file.
After installing, you may see a ? for Ingress IP Address depending on the
cloud provider. For EKS specifically, this is because the ELB is created
with a DNS name, not an IP address. If GitLab is still unable to
determine the endpoint of your Ingress or Knative application, you can
determine it manually.
Determining the external endpoint manually
See the Base domain section for a guide on how to determine the external endpoint manually.
Using a static IP
By default, an ephemeral external IP address is associated to the cluster's load balancer. If you associate the ephemeral IP with your DNS and the IP changes, your apps aren't reachable, and you'd have to change the DNS record again. To avoid that, change it into a static reserved IP.
Read how to promote an ephemeral external IP address in GKE.
Pointing your DNS at the external endpoint
After you have set up the external endpoint, associate it with a
wildcard DNS record (such
as *.example.com.) to reach your apps. If your external endpoint is an IP
address, use an A record. If your external endpoint is a hostname, use a CNAME
record.
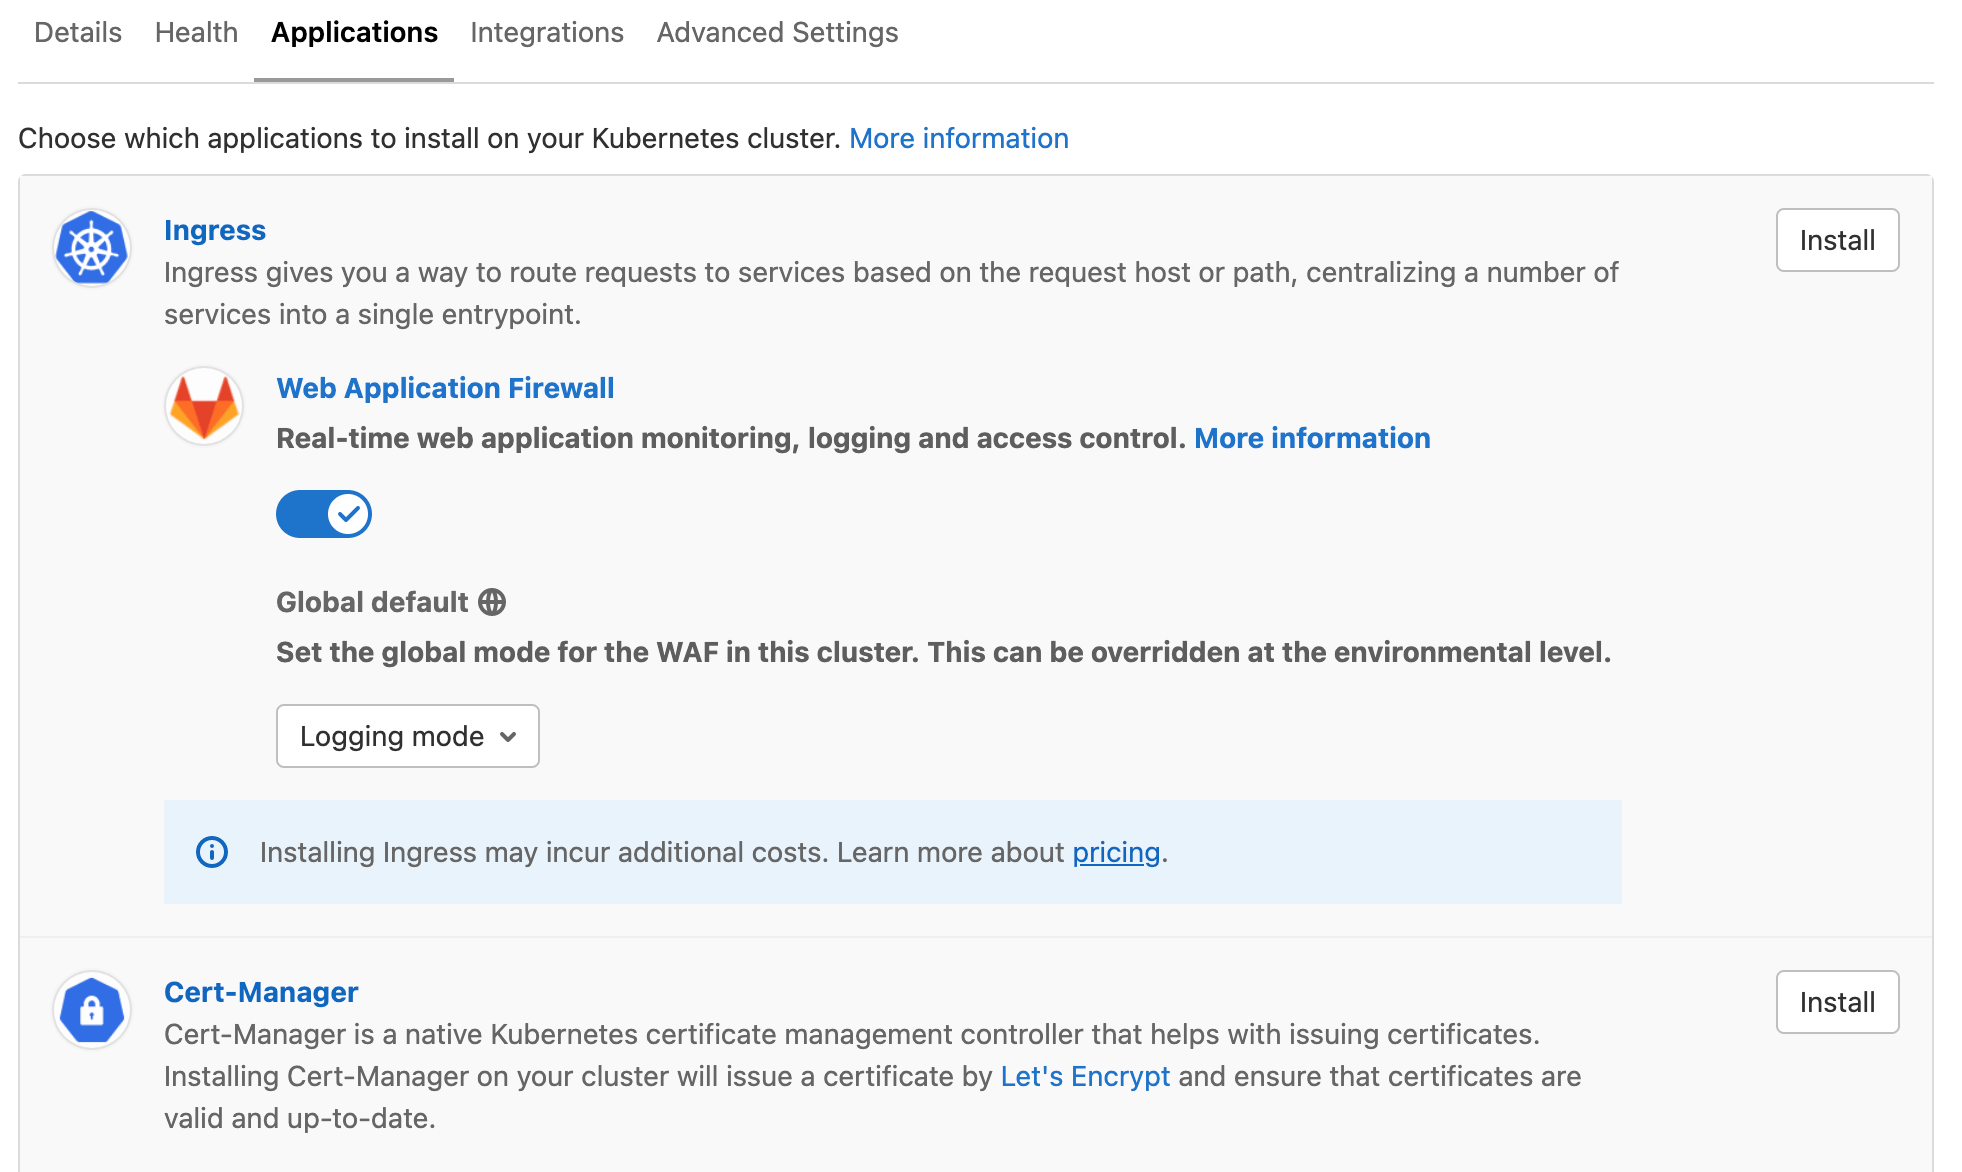
Web Application Firewall (ModSecurity)
Introduced in GitLab 12.7.
WARNING: The Web Application Firewall is in its end-of-life process. It is deprecated in GitLab 13.6, and planned for removal in GitLab 14.0.
A Web Application Firewall (WAF) examines traffic being sent or received, and can block malicious traffic before it reaches your application. The benefits of a WAF are:
- Real-time security monitoring for your application.
- Logging of all your HTTP traffic to the application.
- Access control for your application.
- Highly configurable logging and blocking rules.
By default, GitLab provides you with a WAF known as ModSecurity,
which is a toolkit for real-time web application monitoring, logging, and access
control. GitLab applies the OWASP's Core Rule Set,
which provides generic attack detection capabilities.
This feature:
-
Runs in "Detection-only mode" unless configured otherwise.
-
Is viewable by checking your Ingress controller's
modseclog for rule violations. For example:kubectl -n gitlab-managed-apps logs -l app=nginx-ingress,component=controller -c modsecurity-log -f
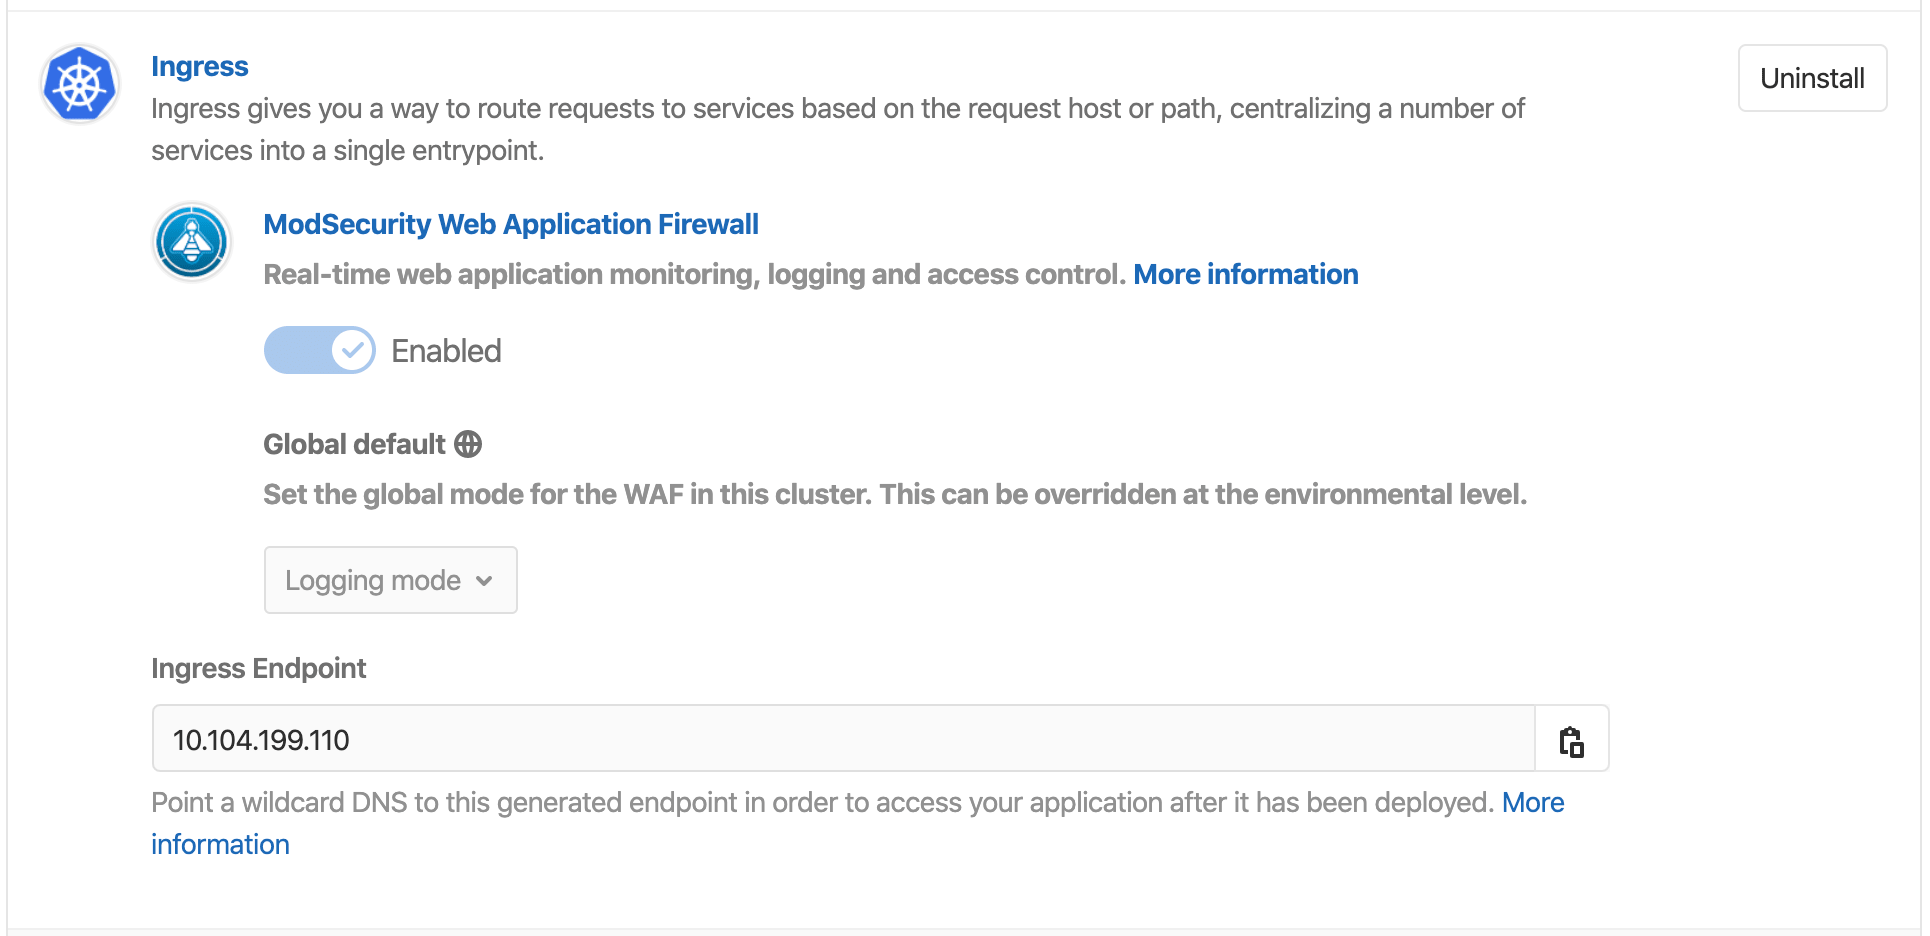
To enable WAF, switch its respective toggle to the enabled position when installing or updating Ingress application.
If this is your first time using the GitLab WAF, we recommend you follow the quick start guide.
There is a small performance overhead by enabling ModSecurity. If this is considered significant for your application, you can disable ModSecurity's rule engine for your deployed application in any of the following ways:
- Set the deployment variable
AUTO_DEVOPS_MODSECURITY_SEC_RULE_ENGINEtoOffto prevent ModSecurity from processing any requests for the given application or environment. - Switch its respective toggle to the disabled position, and then apply changes by selecting Save changes to reinstall Ingress with the recent changes.
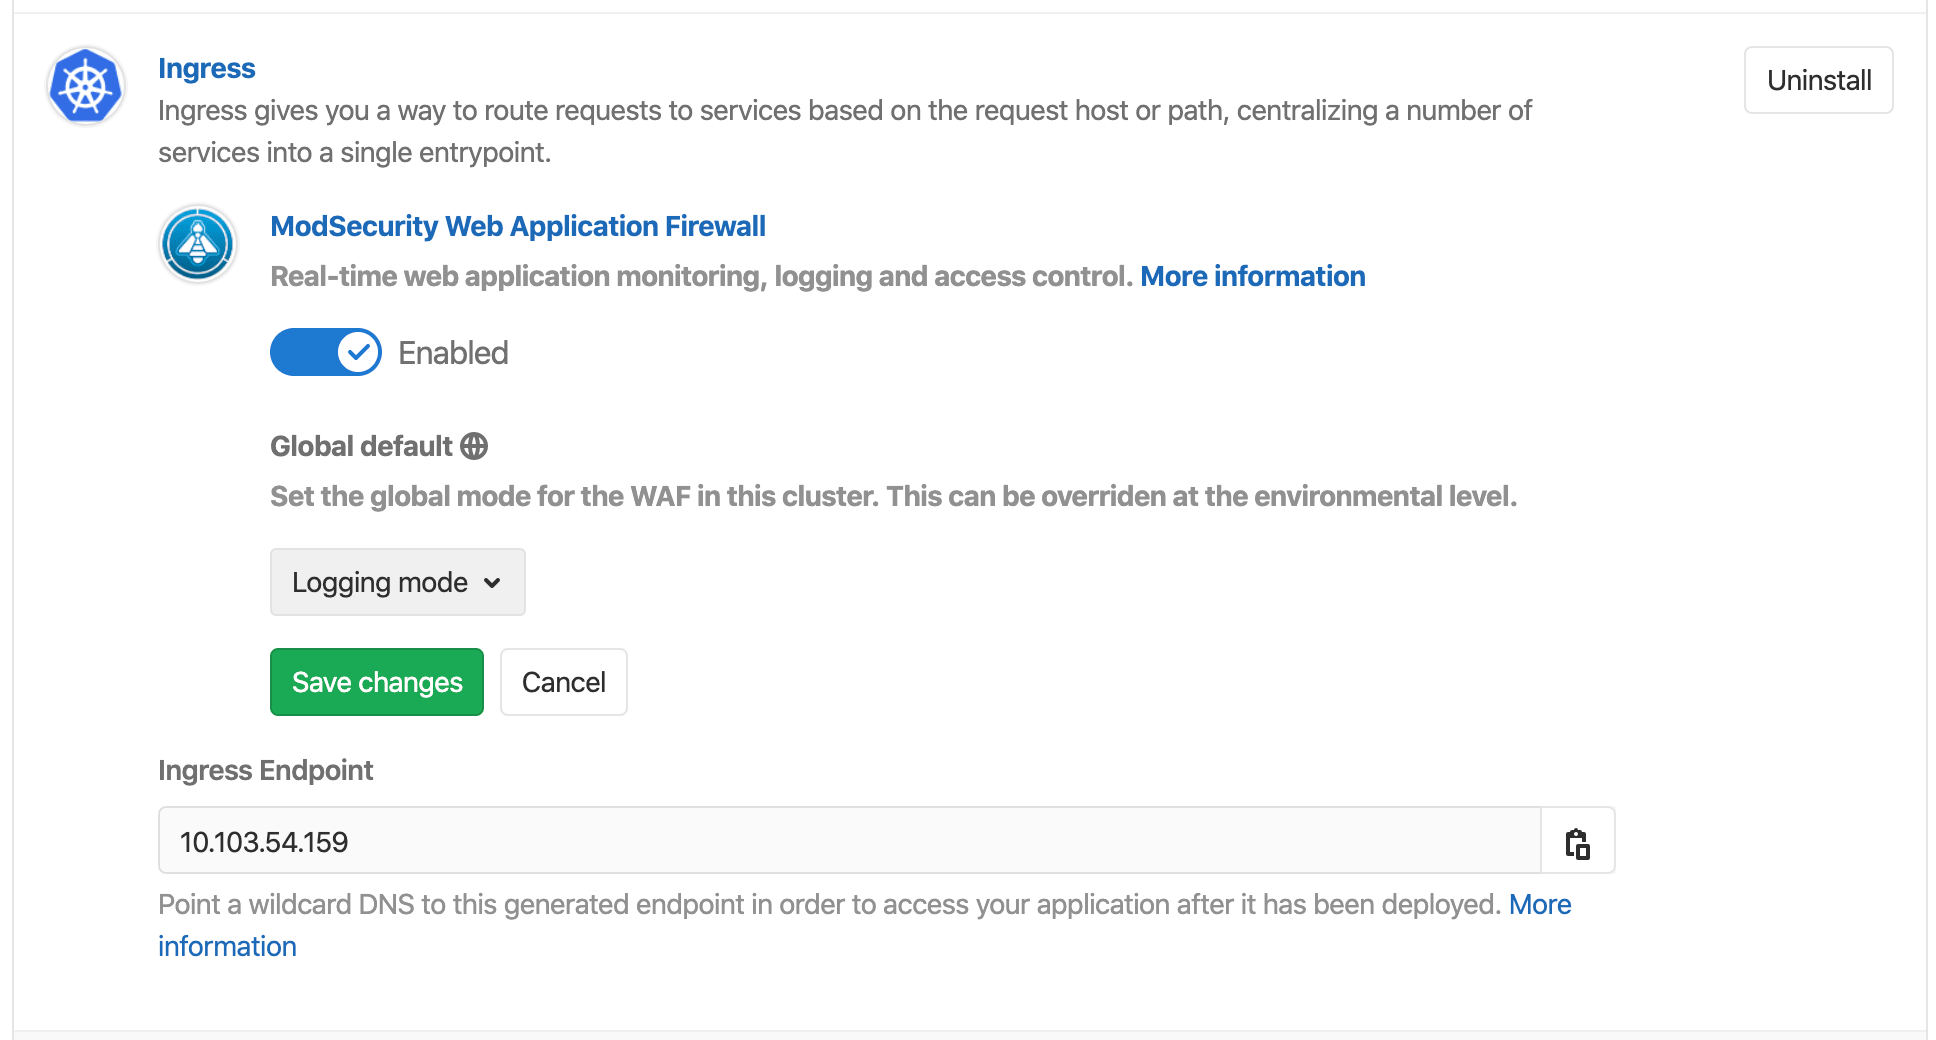
Logging and blocking modes
To help you tune your WAF rules, you can globally set your WAF to either Logging or Blocking mode:
- Logging mode: Allows traffic matching the rule to pass, and logs the event.
- Blocking mode: Prevents traffic matching the rule from passing, and logs the event.
To change your WAF's mode:
- If you haven't already done so, install ModSecurity.
- Navigate to Operations > Kubernetes.
- In Applications, scroll to Ingress.
- Under Global default, select your desired mode.
- Select Save changes.
WAF version updates
Enabling, disabling, or changing the logging mode for ModSecurity is only allowed in same version of Ingress due to limitations in Helm which might be overcome in future releases.
The ModSecurity user interface controls are disabled if the version deployed differs from the one available in GitLab. However, actions at the Ingress level, such as uninstalling, can still be performed:
Update Ingress to the most recent version to take advantage of bug fixes, security fixes, and performance improvements. To update the Ingress application, you must first uninstall it, and then re-install it as described in Install ModSecurity.
Viewing Web Application Firewall traffic
Introduced in GitLab Ultimate 12.9.
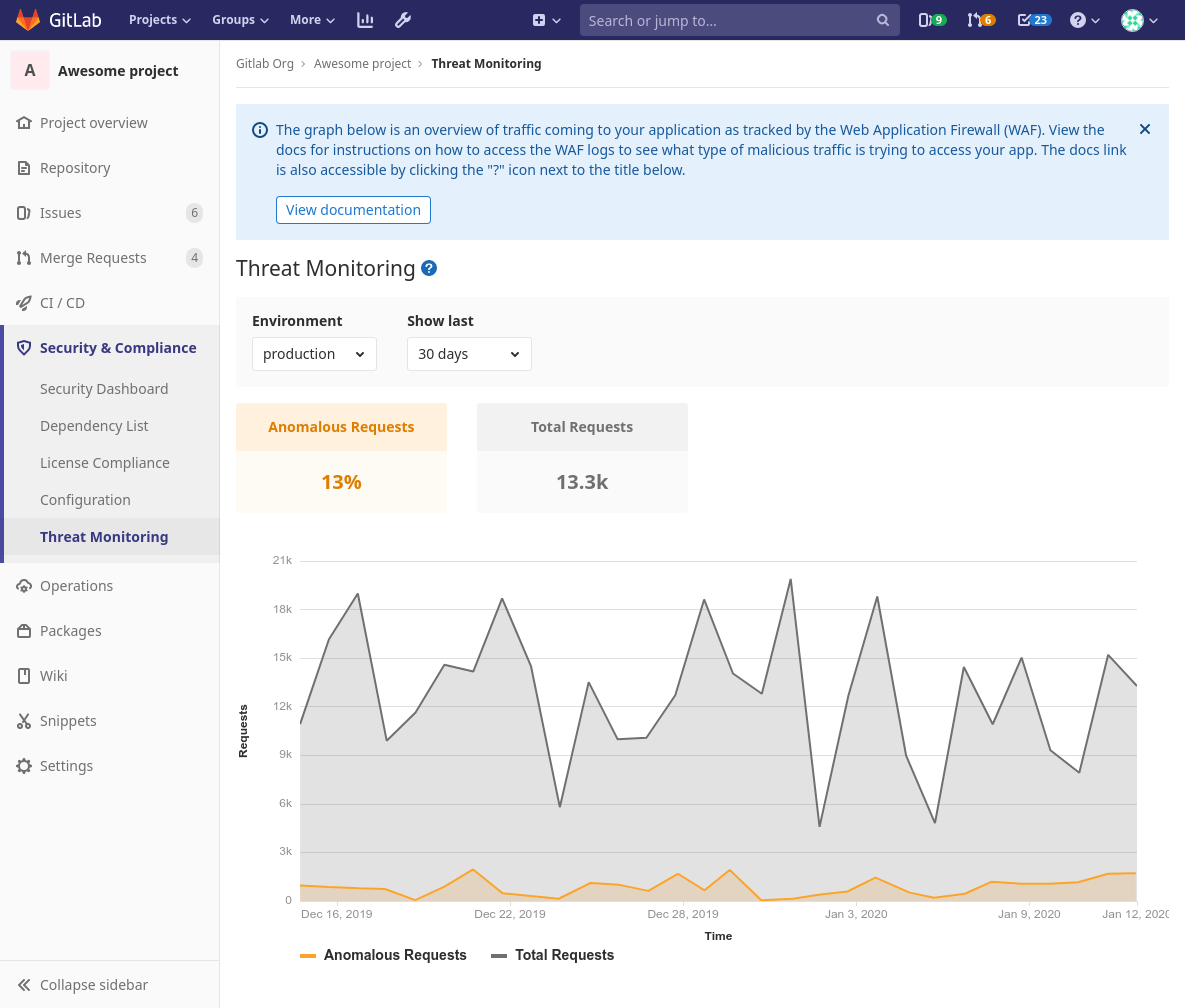
You can view Web Application Firewall traffic by navigating to your project's Security & Compliance > Threat Monitoring page. From there, you can see tracked over time:
- The total amount of traffic to your application.
- The proportion of traffic that's considered anomalous by the Web Application Firewall's default OWASP ruleset.
If a significant percentage of traffic is anomalous, investigate it for potential threats by examining the Web Application Firewall logs.
JupyterHub
- Introduced in GitLab 11.0 for project-level clusters.
- Introduced in GitLab 12.3 for group and instance-level clusters.
JupyterHub is a multi-user service for managing notebooks across a team. Jupyter Notebooks provide a web-based interactive programming environment used for data analysis, visualization, and machine learning.
The jupyter/jupyterhub
chart is used to install this application with a
values.yaml
file.
Authentication is enabled only for project members for project-level clusters and group members for group-level clusters with Developer or higher access to the associated project or group.
GitLab uses a custom Jupyter image that installs additional relevant packages on top of the base Jupyter. Ready-to-use DevOps Runbooks built with Nurtch's Rubix library are also available.
More information on creating executable runbooks can be found in our Runbooks documentation. Ingress must be installed and have an IP address assigned before JupyterHub can be installed.
Jupyter Git Integration
- Introduced in GitLab 12.0 for project-level clusters.
- Introduced in GitLab 12.3 for group and instance-level clusters.
When installing JupyterHub onto your Kubernetes cluster, JupyterLab's Git extension is provisioned and configured using the authenticated user's:
- Name.
- Email.
- Newly created access token.
JupyterLab's Git extension enables full version control of your notebooks, and issuance of Git commands in Jupyter. You can issue Git commands through the Git tab on the left panel, or through Jupyter's command-line prompt.
JupyterLab's Git extension stores the user token in the JupyterHub DB in encrypted format, and in the single user Jupyter instance as plain text, because Git requires storing credentials as plain text Potentially, if a nefarious user finds a way to read from the file system in the single-user Jupyter instance, they could retrieve the token.
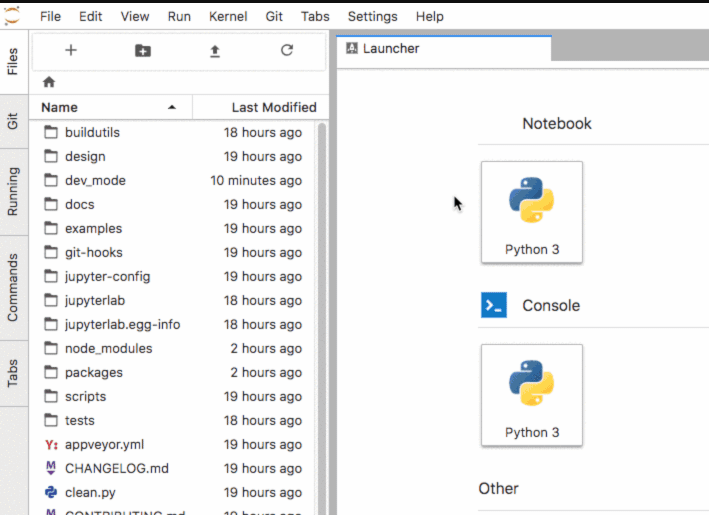
You can clone repositories from the files tab in Jupyter:
Knative
- Introduced in GitLab 11.5 for project-level clusters.
- Introduced in GitLab 12.3 for group- and instance-level clusters.
Knative provides a platform to create, deploy, and manage serverless workloads from a Kubernetes cluster. It's used in conjunction with, and includes Istio to provide an external IP address for all programs hosted by Knative.
The knative/knative
chart is used to install this application.
During installation, you must enter a wildcard domain where your applications
are exposed. Configure your DNS server to use the external IP address for that
domain. Applications created and installed are accessible as
<program_name>.<kubernetes_namespace>.<domain_name>, which requires
your Kubernetes cluster to have
RBAC enabled.
Prometheus
- Introduced in GitLab 10.4 for project-level clusters.
- Introduced in GitLab 11.11 for group-level clusters.
Prometheus is an open-source monitoring and alerting system you can use to supervise your deployed applications.
GitLab is able to monitor applications by using the Prometheus integration. Kubernetes container CPU and memory metrics are collected, and response metrics are also retrieved from NGINX Ingress.
The stable/prometheus
chart is used to install this application with a
values.yaml
file.
To enable monitoring, install Prometheus into the cluster with the Install button.
Crossplane
- Introduced in GitLab 12.5 for project-level clusters.
Crossplane is a multi-cloud control plane to help you manage applications and infrastructure across multiple clouds. It extends the Kubernetes API using:
- Custom resources.
- Controllers that watch those custom resources.
Crossplane allows provisioning and lifecycle management of infrastructure components across cloud providers in a uniform manner by abstracting cloud provider-specific configurations.
The Crossplane GitLab-managed application:
- Installs Crossplane with a provider of choice on a Kubernetes cluster attached to the project repository.
- Can then be used to provision infrastructure or managed applications such as PostgreSQL (for example, CloudSQL from GCP or RDS from AWS) and other services required by the application with the Auto DevOps pipeline.
alpha/crossplane chart v0.4.1 is used to
install Crossplane using the
values.yaml
file.
For information about configuring Crossplane installed on the cluster, see Crossplane configuration.
Elastic Stack
Introduced in GitLab 12.7 for project- and group-level clusters.
Elastic Stack is a complete end-to-end log analysis solution which helps in deep searching, analyzing and visualizing the logs generated from different machines.
GitLab can gather logs from pods in your cluster. Filebeat runs as a DaemonSet on each node in your cluster, and ships container logs to Elasticsearch for querying. GitLab then connects to Elasticsearch for logs, instead of the Kubernetes API, giving you access to more advanced querying capabilities. Log data is deleted after 30 days, using Curator.
The Elastic Stack cluster application is intended as a log aggregation solution and is not related to our Advanced Search functionality, which uses a separate Elasticsearch cluster.
To enable log shipping:
- Ensure your cluster contains at least three nodes of instance types larger
than
f1-micro,g1-small, orn1-standard-1. - Navigate to Operations > Kubernetes.
- In Kubernetes Cluster, select a cluster.
- In the Applications section, find Elastic Stack, and then select Install.
The gitlab/elastic-stack
chart is used to install this application with a
values.yaml
file. The chart deploys three identical Elasticsearch pods which can't be
colocated, and each requires one CPU and 2 GB of RAM, making them
incompatible with clusters containing fewer than three nodes, or consisting of
f1-micro, g1-small, n1-standard-1, or *-highcpu-2 instance types.
Optional: deploy Kibana to perform advanced queries
If you are an advanced user and have direct access to your Kubernetes cluster
using kubectl and helm, you can deploy Kibana manually. The following assumes
that helm has been initialized with helm init.
Save the following to kibana.yml:
elasticsearch:
  enabled: false

filebeat:
  enabled: false

kibana:
  enabled: true
  elasticsearchHosts: http://elastic-stack-elasticsearch-master.gitlab-managed-apps.svc.cluster.local:9200
Then install it on your cluster:
helm repo add gitlab https://charts.gitlab.io
helm install --name kibana gitlab/elastic-stack --values kibana.yml
To access Kibana, forward the port to your local machine:
kubectl port-forward svc/kibana-kibana 5601:5601Then, you can visit Kibana at http://localhost:5601.
Fluentd
Introduced in GitLab 12.10 for project- and group-level clusters.
Fluentd is an open source data collector, which enables you to unify the data collection and consumption to better use and understand your data. Fluentd sends logs in syslog format.
To enable Fluentd:
- Navigate to Operations > Kubernetes and click Applications. Enter a host, port, and protocol for sending the WAF logs with syslog.
- Provide the host domain name or URL in SIEM Hostname.
- Provide the host port number in SIEM Port.
- Select a SIEM Protocol.
- Select at least one of the available logs (such as WAF or Cilium).
- Click Save changes.

Upgrading applications
Introduced in GitLab 11.8.
The applications below can be upgraded.
| Application | GitLab version |
|---|---|
| GitLab Runner | 11.8+ |
To upgrade an application:
- For a:
- Project-level cluster, navigate to your project's Operations > Kubernetes.
- Group-level cluster, navigate to your group's Kubernetes page.
- Select your cluster.
- If an upgrade is available, the Upgrade button is displayed. Click the button to upgrade.
Upgrades reset values back to the values built into the runner chart, plus the values set by
values.yaml
Uninstalling applications
Introduced in GitLab 11.11.
The applications below can be uninstalled.
| Application | GitLab version | Notes |
|---|---|---|
| cert-manager | 12.2+ | The associated private key is deleted and cannot be restored. Deployed applications continue to use HTTPS, but certificates aren't renewed. Before uninstalling, you may want to back up your configuration or revoke your certificates. |
| GitLab Runner | 12.2+ | Any running pipelines are canceled. |
| Helm | 12.2+ | The associated Tiller pod, the gitlab-managed-apps namespace, and all of its resources are deleted and cannot be restored. |
| Ingress | 12.1+ | The associated load balancer and IP are deleted and cannot be restored. Furthermore, it can only be uninstalled if JupyterHub is not installed. |
| JupyterHub | 12.1+ | All data not committed to GitLab are deleted and cannot be restored. |
| Knative | 12.1+ | The associated IP are deleted and cannot be restored. |
| Prometheus | 11.11+ | All data are deleted and cannot be restored. |
| Crossplane | 12.5+ | All data are deleted and cannot be restored. |
| Elastic Stack | 12.7+ | All data are deleted and cannot be restored. |
| Sentry | 12.6+ | The PostgreSQL persistent volume remains and should be manually removed for complete uninstall. |
To uninstall an application:
- For a:
- Project-level cluster, navigate to your project's Operations > Kubernetes.
- Group-level cluster, navigate to your group's Kubernetes page.
- Select your cluster.
- Click the Uninstall button for the application.
Support for uninstalling all applications is planned for progressive rollout. To follow progress, see the relevant epic.
Troubleshooting applications
Applications can fail with the following error:
Error: remote error: tls: bad certificateTo avoid installation errors:
-
Before starting the installation of applications, make sure that time is synchronized between your GitLab server and your Kubernetes cluster.
-
Ensure certificates are not out of sync. When installing applications, GitLab expects a new cluster with no previous installation of Helm.
You can confirm that the certificates match by using
kubectl:kubectl get configmaps/values-content-configuration-ingress -n gitlab-managed-apps -o \ "jsonpath={.data['cert\.pem']}" | base64 -d > a.pem kubectl get secrets/tiller-secret -n gitlab-managed-apps -o "jsonpath={.data['ca\.crt']}" | base64 -d > b.pem diff a.pem b.pem
Error installing managed apps on EKS cluster
If you're using a managed cluster on AWS EKS, and you are not able to install some of the managed apps, consider checking the logs.
You can check the logs by running the following commands:
kubectl get pods --all-namespaces
kubectl get services --all-namespaces
If you are getting the Failed to assign an IP address to container error, it's probably due to the
instance type you've specified in the AWS configuration.
The number and size of nodes might not have enough IP addresses to run or install those pods.
For reference, all the AWS instance IP limits are found
in this AWS repository on GitHub (search for InstanceENIsAvailable).
Unable to install Prometheus
Installing Prometheus is failing with the following error:
# kubectl -n gitlab-managed-apps logs install-prometheus
...
Error: Could not get apiVersions from Kubernetes: unable to retrieve the complete list of server APIs: admission.certmanager.k8s.io/v1beta1: the server is currently unable to handle the request
This is a bug that was introduced in Helm 2.15 and fixed in 3.0.2. As a workaround,
ensure cert-manager is installed successfully prior to installing Prometheus.
Unable to create a Persistent Volume Claim with DigitalOcean
Trying to create additional block storage volumes might lead to the following error when using DigitalOcean:
Server requested
[Warning] pod has unbound immediate PersistentVolumeClaims (repeated 2 times)
[Normal] pod didn't trigger scale-up (it wouldn't fit if a new node is added):
Spawn failed: Timeout
This is due to DigitalOcean imposing a few limits with regards to creating additional block storage volumes. Learn more about DigitalOcean Block Storage Volumes limits.
Take ownership of your GitLab Managed Apps
Introduced in GitLab 13.12.
With the removal of the One-click install method in GitLab 14.0, the Applications tab (under your project's Operations > Kubernetes) will no longer be displayed:
This tab was dedicated to installing and maintaining GitLab Managed Apps. To continue managing your installed applications, one of the possible ways is to install Helm locally, as described below.
View installed applications
To view the applications you have installed in your cluster through GitLab Managed Apps,
you need to verify the resources you have in the gitlab-managed-apps namespace.
On your computer, configure kubectl
to connect to your cluster, open the terminal and run:
kubectl get all -n gitlab-managed-appsIf there is no output or the namespace does not exist, you do not have any applications installed through GitLab Managed Apps. If this is the case, you have nothing else to do.
Identify the Helm version
Next, verify which Helm version GitLab used to install your applications.
For apps installed with Helm v3
To list your apps installed with Helm v3, run:
kubectl get secrets -n gitlab-managed-apps | grep 'helm.sh/release'You can manage these applications with Helm v3 and you don't need any further steps.
All applications not listed with the command above were installed with Helm v2.
For apps installed with Helm v2
If you have apps installed with Helm v2, you can either:
- A. Install Helm v3 and upgrade your apps to Helm v3.
- B. Install Helm v2 and keep using this Helm version, which is not recommended as Helm v2 was deprecated in favor of Helm v3.
If you choose to keep using Helm v2 (B), follow the steps below to manage your apps:
-
Install Helm v2 in your computer.
-
Start a local Tiller server:
export TILLER_NAMESPACE=gitlab-managed-apps tiller -listen localhost:44134 -
In another tab, initialize your Helm client:
export HELM_HOST="localhost:44134" helm init --client-only -
Now your environment is ready to manage your apps with Helm v2. For example, to list your releases:
helm ls
Cluster integrations
Some applications were not only installed in your cluster by GitLab through Managed Apps but were also directly integrated with GitLab so that you could benefit from seeing, controlling, or getting notified about them through GitLab. To keep them integrated, read the documentation for: